The .NET 8 Performance post is here!

The .NET 8 performance post is here! Each release the perf post is the one I look forward to the most. Stephen Toub always covers an exhaustive list of tweaks and improvements for each release. Its a great way to find out what got faster, but better yet, it’s a great way to see how the .NET team improves those hot paths so you can use the same concepts and patterns in your own apps.

Check out the new ForceYielding for Tasks

https://devblogs.microsoft.com/dotnet/performance-improvements-in-net-8/

Posted in Windows Phone | Tagged , , , | Leave a comment

WFH DIY Meeting Light Bulb

Honey, are you on the phone?

When working from home, interruptions are a given. Sometimes its fine and other times I’m in a customer meeting and need privacy, but my family never knows which. My schedule changes during the day as meetings get created or cancelled and having my headphones on doesn’t necessarily mean I’m in a meeting.

To prevent the pop your head into my office and mime “are you on the phone?” routine, I decided to put a signal outside my workspace and synchronize it with my O365 work calendar. A simple lamp – if the light is on, I’m in a scheduled meeting. When the meeting finishes I want the lamp to turn off.

I wanted to trigger this with little to no code (something like Azure Logic Apps or Power Automate). That means I need a bulb that can be controlled remotely from the cloud. After a short search I found the LIFX Mini White Wi-Fi Smart LED Light Bulb. It connects to your home wifi and LIFX provides an API to control it.

Keep in mind there are lots of home automation solutions – this is just the one I chose.

The Solution

LIFX provides an API which I could call directly using an Azure function, but I wanted to do this with as little code as possible. Azure Logic Apps has integration to my O365 calendar, but doesn’t have any default connectors to LIFX. IFTTT supports LIFX connectors but only supports “when an O365 event is about to start” which helps me turn on the bulb, but not turn it off when the meeting finishes.

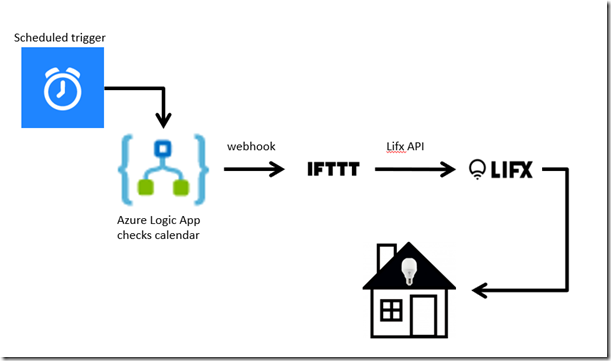
The end solution is a combination of all three

I worked backwards from the light bulb so I could test each stage.

IFTTT

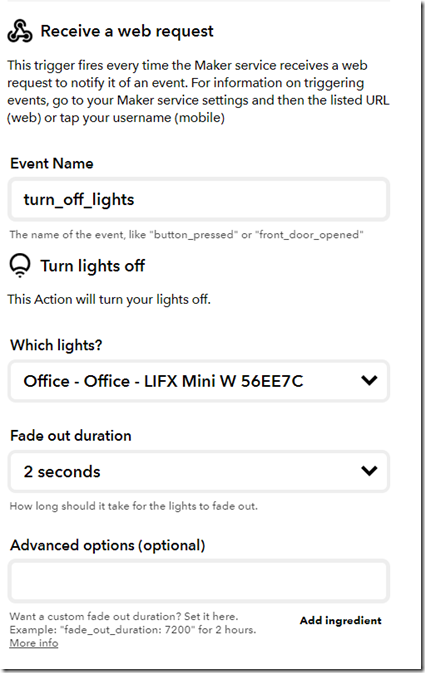
I created two applets. One to turn the light on and one to turn it off. For the trigger, I used a webhook and named the event “turn_off_lights.” For the action I used the LIFX action and configured it to “Turn lights off”. Then I set which bulb to turn off and set it to a 2 second fade.

ifttlightsoff

Then I created another similar applet except for “lights on”.

Now I have two separate webhooks I can invoke that will turn my light on or off on demand. I can test it by hitting webhook which looks something like this

https://maker.ifttt.com/trigger/<YOUREVENT>/with/key/<YOURKEYHERE>

You can get your exact URL and key from https://ifttt.com/maker_webhooks and clicking on Documentation.

Now to scheduling it.

Azure Logic Apps

Logic apps provides a trigger for “event starting soon” but that only helps with the “turn on” aspect. I also need to know when the meeting ends so I can turn off the bulb. Also, if there is another meeting starting immediately, I don’t want to turn it off. This means I’ll just have to poll my calendar and turn the light on/off if there is a current meeting or not.

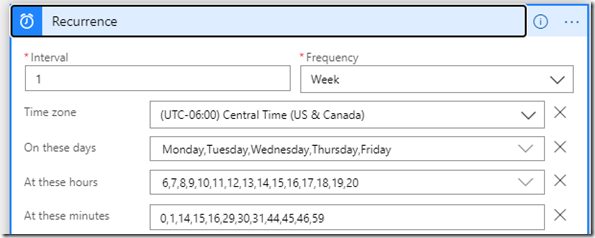
Fortunately the Recurrence Trigger is extremely flexible. I set mine up like this

recurrencescheduler

This way it will run Mon-Fri on the hours of 6am-10pm central time and only trigger every 15 minutes plus the minute before and after. My meetings usually start on 15 minute intervals, so the trigger will run just before and after the start and end of every possible meeting.

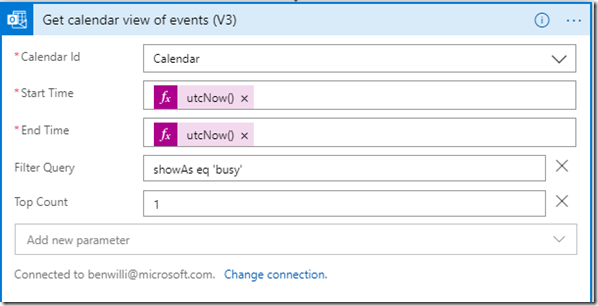
Next I need to check for the status of the calendar events. I need to query for any “show as busy” meetings at the scheduled times. Use the Get Calendar View of Events for this

getcalendarviewofevents

Whenever invoked, get the events for only now and filer them based on the showAs property.

Next I need to just call either the lights on webhook or the lights off webhook based on whether we got any results from the calendar query

isbusycondition

The condition is whether the expression

length(body(‘Get_calendar_view_of_events_(V3)’)?[‘value’])

is greater than 0. If it is, that means we found a busy calendar event happening right now and we turn the light on. If not, we turn the light off. The two HTTP activities simply POST to my webhooks I created earlier.

In the end the workflow looks like this

workflow

Final words

Now that this is all set up, I have a lamp which turns on and off based on my meetings in my outlook calendar. We’ll see if its actually useful this week or if it needs some tweaks.

In my github there is a simple click to deploy ARM deployment template for the logic app if you want to try it out and/or point it to different light bulb solution.

FYI – I’m exploring synchronizing it to my Teams presence since that switches to “busy” automatically when I join a call, but the Teams API for getting your presence is currently in beta and so may require permissions I don’t have in my org.

[UPDATE]

It seems the IFTTT webhooks have not been reliable in their timing. While working fine during initial testing, some are responding hours after getting invoked. So I have updated the Azure Logic App to call the LIFX API directly and removed IFTTT as a middleman. I should have done that in the first place but hadn’t looked at the LIFX API yet. The github repo deploy reflects the new change.

Posted in automation, Azure, Tinkering | Leave a comment

Deploying a Virtual Assistant on the cheap

The Virtual Assistant Solution (VA) brings together all of the supporting components and greatly simplifies the creation of a new bot project including: basic conversational intents, Dispatch integration, QnA Maker, Application Insights and an automated deployment. Since it is designed to also encompass many of the best practices needed for an enterprise grade application, its deployment templates include enterprise grade solutions in Azure. This means setting up services with the capability of high availability and scale. But… sometimes you just want to test something out with the bare minimum pieces and cost just to see it work and see how it works.

The VA template deploys its resources via an ARM template and you can supply a parameters file to the deployment script to change how that deployment happens. The thing I was interested in recently was deploying to the smallest and least expensive dev/test instances of the various services in order to keep the cost down. Since this was just for demo purposes and I would be the only one talking to the bot, I didn’t need the capacity and scale of the default install.

This requires a couple of additional steps to be taken. First…

Modify the parameters file

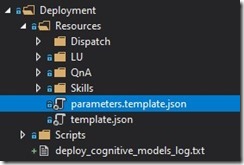
The VA template already provides a parameters file you can use. It is located in the Deployments/Resources directory of the bot.

parametersfilelocation

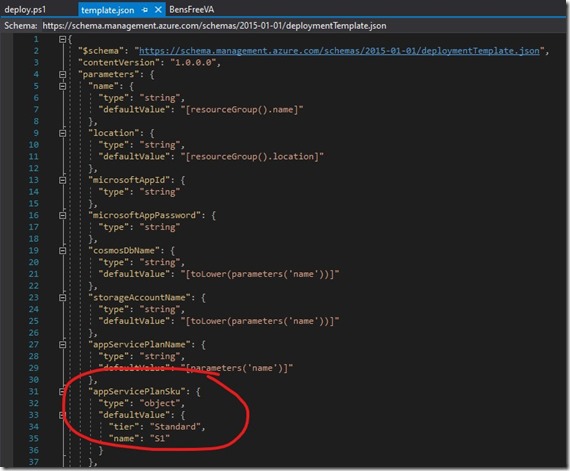
You can add whatever ARM template parameters you want to change into the file. Have a look at the ARM template used for deployment (the deployment.json file in the same directory) and you will see a whole host of parameters we can modify in the parameters section of the document.

Here is the template in my project. You will notice it lists parameters for the various SKUs of the services. In this example the default app service plan is going to be created as a Standard (S1) plan.

templateexample

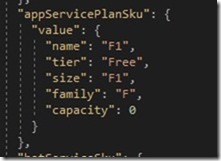
We can change that by overriding it in the parameters file by including a new “appServicePlanSku” object with the plan we want to use – the Free (F0) plan.

freeappserviceplan

Use the parameter file when deploying

To use the parameter plan when deploying you just need to add it to the deploy.ps1 command by using the –parametersFile parameter.

.\Deployment\Scripts\deploy.ps1 -parametersFile .\Deployment\Resources\parameters.template.json

Then when the template gets deployed to Azure, your parameters will override the default values in the template.

I’ve saved my parameters file to a gist at https://gist.github.com/negativeeddy/0d6458daee5884bd2167f54f42c7d587

In that file, I’ve changed the following SKUs to free instances

  • Azure Search service
  • QnA Maker Service
  • Bot App Service Plan
  • Bot Service
  • Content Moderator
  • LUIS

Additional Notes

Remember that because of the limitations of the free services, this is not something you would do for production or even normal development scenarios. For example

  • You can easily hit the rate & transaction limits of the various free service tiers when a team is actively developing a bot.
  • You can not have more than one free search service in a subscription
  • The free tier of app service plans will always spin down after a period inactivity (meaning the first time you hit the bot later, there may be a delay)

But if you just want to deploy something to tinker with and see how it works, without incurring as much cost, you can override the default SKUs and have something up and running in just a few minutes.

If you don’t know what the SKUs should be, you can always create the resource in Azure and then select “export template” to see the values that are used to create it.

Posted in Azure, bots | 1 Comment

You’ve got a little bot in your Blazor there

Since Blazor is now officially not-experimental (meaning it is now officially in preview) I figured I’d try to mix it in with my other favorite thing right now… Bots! (For those of you unfamiliar with Blazor, the short description is “run C# libraries in the browser!”)

So what would a bot looked like if it ran on Blazor? It would mean actually running our bot in the browser directly, instead of running it in a web service (while still having the option to move it to the server if we wanted to).

For this demonstration, I’m going to use a very simple bot – the Echo bot from the BotBuilder Samples repo. This is so we can focus on how the bot gets connected to a Blazor app and not worry about typical bot things (LUIS, conversation management, state, etc). We’ll talk the possible impact on those things in the wrap up.

To get our bot running in a Blazor client side app, we need to follow these steps

  1. Create an standard Blazor app
  2. Add the echo bot to the blazor app
  3. Create the Blazor bot adapter
  4. Update the blazor app to talk to bot adapter

Create a Blazor app

For this concept we are just going to start with the default Blazor template for Blazor (client-side). Just follow the instructions for Getting Started in the Blazor document and make sure to select the Blazor (client-side) template or the Blazor (ASP.NET Core Hosted) template when that choice comes up.

NOTE: At the time of this writing you need Visual Studio 2019 Preview to run Blazor apps (the preview that came out after the release of VS 2019)

You should end up with a solution that looks something like this
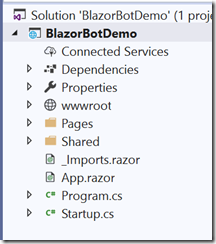
blazorclientproject

Run the app. Click around and make sure it is functional. Once we verify that we have a running Blazor app its time to…

Add echo bot to the blazor app

Add the bot references

First we need to add the bot assembly references to the app. Bot framework v4 is built on .NET Standard 2.0 libraries so they will run inside Blazor (mostly). Use NuGet to add a reference to Microsoft.Bot.Builder v4.x. Now when you build the app you may get an error similar to

Cannot find declaration of exported type ‘System.Threading.Semaphore’ from the assembly ‘System.Threading, Version=4.0.12.0, Culture=neutral, PublicKeyToken=b03f5f7f11d50a3a’

This is because Blazor attempts to do a linking step at build time. This is an optimization that allows it to remove unnecessary IL from the app’s output assemblies. Unfortunately this causes a problem with the current version so you need to disable this by adding the following line to your BlazorBot.Client.csproj file’s main PropertyGroup section.

<BlazorLinkOnBuild>false</BlazorLinkOnBuild>

This will tell the build to skip the linking phase. Because we aren’t using that particular code at runtime, it wont become a problem later.

Add the bot

Create a folder in the project named “Bot” and create a new class “EchoBot” in that folder. Copy the EchoBot code from the sample https://github.com/Microsoft/BotBuilder-Samples/blob/master/samples/csharp_dotnetcore/01.console-echo/EchoBot.cs
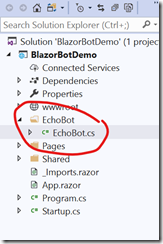
addedechobot

This is a standard bot. There is nothing specific to Blazor about it. Next we need to…

Create the Blazor bot adapter

What is an adapter? from the Console Bot sample:

Adapters provide an abstraction for your bot to work with a variety of environments.

A bot is directed by it’s adapter, which can be thought of as the conductor for your bot. The adapter is responsible for directing incoming and outgoing communication, authentication, and so on. The adapter differs based on it’s environment (the adapter internally works differently locally versus on Azure) but in each instance it achieves the same goal.

Blazor is not one of the standard channels for Bot Framework, so we need to create our own adapter to route messages in and out of the bot. Also, because a Blazor client-side app doesn’t refresh the page, the bot will get created only once and reused over and over. This is very similar to the Console Bot sample so we will use its adapter as a base.

The primary difference is that the Console adapter runs an infinite loop pulling input from the command line. We will provide a mechanism for the input to be fed in via a method call, and an event to notify the host when a bot response happens.

Add a class named BlazorAdapter to the EchoBot folder.

Create a public event on the BlazorAdapter for the client to subscribe to in order to receive new activities from the bot.

BotAdapterEventDefinition

Create a class named ConversationEventArgs defined like this
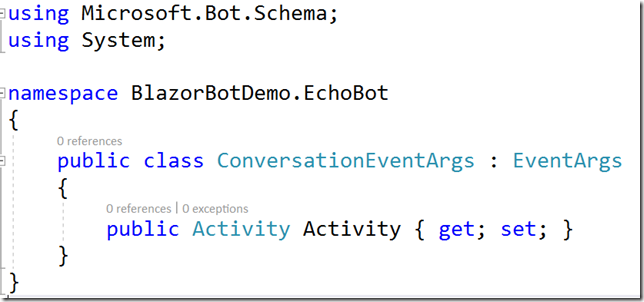
conversationEventArgs

This is the event that the bot adapter will raise whenever the bot communicates with the client. The bot activity will be passed in the event argument Activity.

Now modify the BlazorAdapter so that it derives from BotAdapter. The abstract class BotAdapter has 3 abstract methods you must override, but we will only need to implement one of them for this exercise.

  • SendActivitiesAsync – this is invoked whenever the bot sends activities back to the client. We will use it to raise an event to notify the client UI a new activity is available.
  • UpdateActivityAsync – this is used to replace an existing activity in a conversation. We won’t need it.
  • DeleteActivityAsync – this is used to delete an activity from a conversation. We won’t need it.

Override the SendActivitiesAsync method with the following

SendActivitiesAsync

whenever the bot sends a response, this method will be called and the adapter will raise the event for each activity the bot sends.

Now add a method to the adapter called ProcessMessageAsync which we will use to send messages to the bot. It looks like this
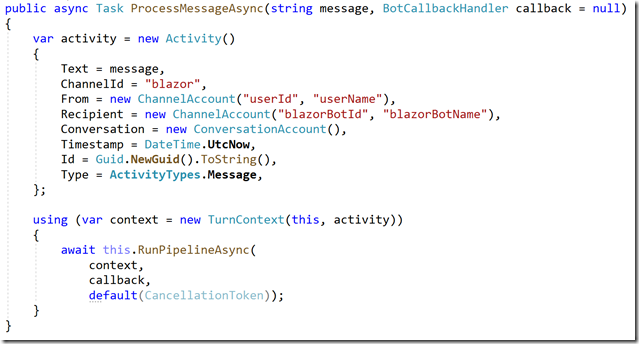
ProcessMessageAsync

This method simple takes a string and turns it into a bot activity with default values and runs the bot pipeline.

Now that the adapter is built, we just need to put the bot and the adapter on the Blazor page and wire them up.

Update the Blazor app to talk to bot adapter

Now we need to build a UI that interacts with the bot adapter. We can’t use the standard webchat control because it assumes you want to talk to the bot connector service in the standard scenario. We need the UI to accept some text as input and respond to the bot adapter’s event for output from the bot.

Its theoretically possible to modify the webchat control to redirect its input/output directly to our adapter but that’s beyond the scope of this simple experiment.

Open the counter.razor page and place the following using statements immediately below the @page “/counter” directive

@using Console_EchoBot
@using BlazorBotDemo.EchoBot
@using Microsoft.Bot.Schema
@using Microsoft.Bot.Builder

Console_EchoBot is the namespace of the actual bot.
BlazorBotDemo.EchoBot is the namespace of you BlazorAdapter class
The other two namespaces are needed for the upcoming code.

Replace the HTML section with the following

blazorBotHtml

This has one input textbox to send messages to the bot and the output from the bot will be placed into the conversation variable which will be a collection of strings

Replace the @functions section with the following
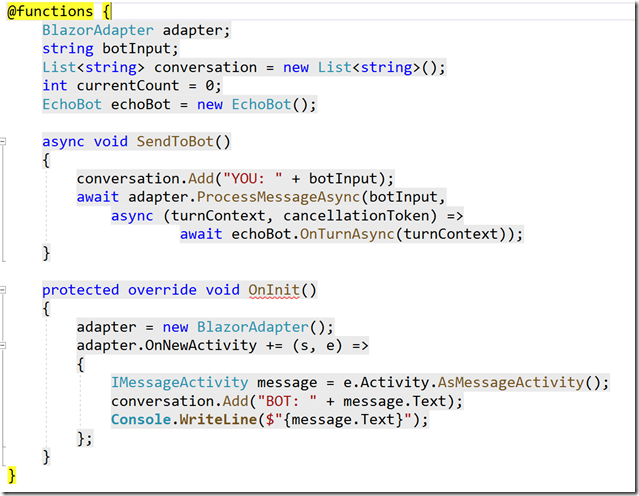
blazorFunctions

The OnInit function creates the adapter and wires up the event to recieve activities from the bot. When an activity is recieved, we extract the message and update the conversation collection with the new message.

The SendToBot function is invoked when the user clicks the button. At that time we take the string from the textbox and tell the adapter to process it, sending it to the bot.

Run the app and on the Counter page, you should be able to interact with the bot on the Counter page!
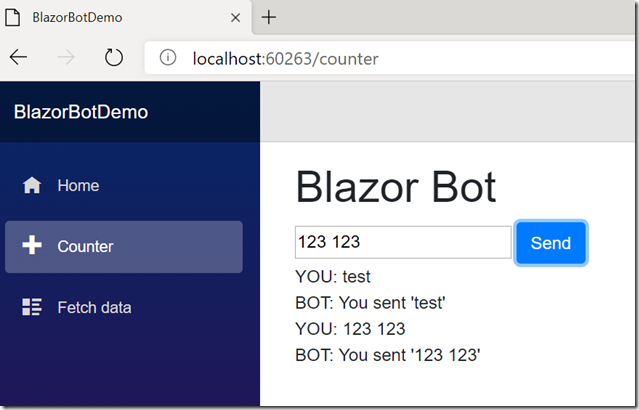
working bot

A full running example of this is available at https://github.com/negativeeddy/BlazorBot

Happy coding!

Posted in blazor, bots | Tagged , , | 1 Comment

Raw threads and async lambdas

Using async methods/lambdas where they are not expected causes unexpected problems. The typical example I discuss with people is TaskFactory.StartNew() because its an easy way to create Tasks and some people reach for that instead of Task.Run(), but I recently came across some code hitting the same problem while creating threads the traditional way.

In this scenario, the code was intended to create some child threads that poll a resource. That resource would sometimes be changed and the master thread would Abort() the child threads and create new ones polling the new resource. But there was a thread leak. Sometimes threads could continue to run after they should have been aborted.

A simplified example looks like this in a console application (I’m not creating the new threads after the abort because its not relevant to the bug in the logic).

capture20180827101340802

We are simply starting two threads, waiting 1 second, and then aborting them. We assume they will stop and not output anything after the “Press ENTER” line. But notice that the two thread functions are asynchronous. What does that mean? As I’ve discussed before you can’t really make any assumptions about the internals of the async code you are calling. You can only know what you are doing yourself around the async operation. What we are doing here is “Start this asynchronous operation on another thread.” We don’t really know when this method will end, or even if it will end on our thread.

So when does our thread end? Can we even abort the operation this way? Not reliably, no.

If the code happens to look like this, we can abort it.

capture20180827102020875

But that’s only because there is no asynchrony actually going on. This will run synchronously on the original thread that called it. But that’s pretty uncommon. More likely there is some asynchrony going on inside it like this

capture20180827102720938

In this case there is an asynchronous delay. This means that all of the iterations of the loop after 0, will happen as asynchronous continuations. Where will they run? It depends on the context. In this example, a console application, they will run on a random thread pool thread.

That means that when I try to abort the thread I created, I’m just aborting the initial thread which is handling the first portion of the method. If the application gets to the await before it gets to the abort, the continuation will already scheduled and will go on oblivious to the fact that the original thread gets aborted. I can’t abort this method using Thread.Abort() because method isn’t just one thread.

Here is what the output looks like. You can see that until the abort happens (immediately before the “Press ENTER” text) the threads are pumping out even and odd numbers. After the abort, the PrintEvenNumbers method is happily continuing its way into infinity.

capture20180827103138495

How to avoid this?

  • Stick with Tasks and avoid raw Thread code if you can help it. The threading APIs predate the Task/Async APIs by a decade. Mixing the two can result in bugs like this one unless you are extra careful. Task.Run() is your friend for spawning/managing new Tasks, and it is async lambda friendly.
  • Avoid Thread.Abort() like the plague. There are some unusual cases where it makes sense, but the vast majority of the times I see it, I consider it to be a bug. .NET provides a very clean cooperative cancellation mechanism that is simple and thread safe (the CancellationToken) which should be used instead to signal a child task to tear itself down cleanly and predictably.
  • More on why async lambdas behave this way from the .NET Framework team

The sample code above is available here

Posted in async, c# | Tagged , , , , | Leave a comment

Quick dev directory cleanup tip

[Crosspost from my MSDN blog]

When cleaning up drive space, the first thing I do is remove the ‘obj’, ‘bin’, and ‘packages’ directories from my development directories. They are temporary and will be rebuilt the next time I build the related project. Because I end up with a lot of little test & sample projects that I don’t refer to often, their binaries and nuget directories are just taking up space.

The reason this is better than doing a Clean Solution is that Clean Solution only removes the outputs of the build. It doesn’t remove the nuget packages which in my case were a significant percentage of my overall dev directory space.

The old way

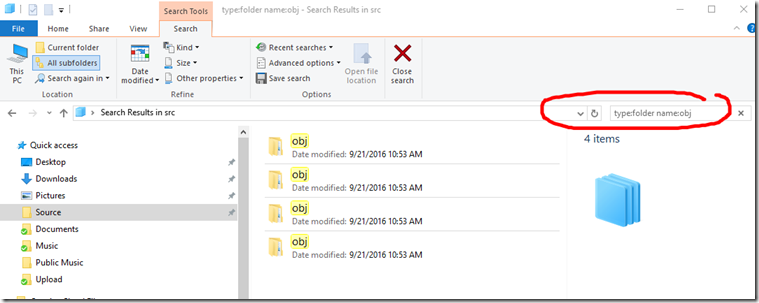
I used to do this with a little Windows Explorer trick – search filters. It looks like this

capture20160921110426561

“type:folder name:obj” tells explorer to find all the items that have “obj” in the name and are folders. Then I can easily “Select All” and delete. Then repeat for Bin and for Packages. (There is one caveat here that the name search is a substring search, so it will also return directories named “object” too.)

The PowerShell way

But today I got to thinking. I wanted to do that in one step. So here is a PowerShell command that will iterate from the current directory and find all child directories named ‘obj’, ‘bin’, or ‘packages’ and prompt me to delete them.

get-childitem -Directory -Recurse | where-object {$_.Name -eq ‘bin’ -or $_.Name -eq ‘obj’ -or $_.Name -eq ‘packages’} | Remove-Item –Force –Recurse

I put this in a file named clean-devfolder.ps1 and it works like a champ.

If, instead, you want to see a preview of which directories will be removed, you can add -WhatIf to the end of the whole command.

Posted in tips | 1 Comment

C# Zork running on Ubuntu

So I’ve finally got my VSTS builds running on Ubuntu (and Windows). I haven’t installed Linux on a PC in well over a decade but it has come a long way in that time.

  1. Installed Ubuntu 16.04 on HyperV on my Windows 10 dev box. Just boot the HyperV machine to an Ubuntu install disc. That was easy!
  2. Update the project.json file of my .NET Core console host
    1. to build a self-contained application (not required but I figured it would help prevent any deployment weirdness later on)
    2. to target windows and ubuntu so I can use the “dotnet publish” command
      "runtimes": {
        "win10-x64": {},
        "osx.10.11-x64": {},
        "rhel.7.2-x64": {},
        "ubuntu.14.04-x64": {}
      }
    3. Include my game data folder in the publish output
      "publishOptions": {
        "include": [ "GameFiles" ]
      },
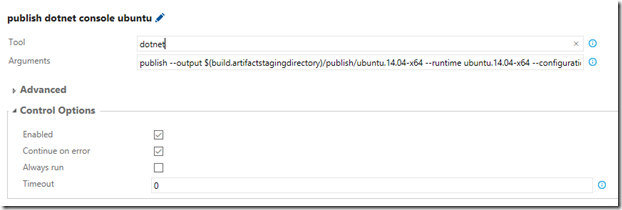
  3. Updated the VSTS build to include two command line tasks to do the publish for both Windows and Ubuntu
    1. Add a Command Line Task
    2. Set the Tool to “dotnet”
    3. Set the Arguments to “publish –output $(build.artifactstagingdirectory)/publish/ubuntu.14.04-x64 –runtime ubuntu.14.04-x64 –configuration Release”capture20160814125439163

      This publish command will publish the given runtime package to the directory that will ultimately be copied to the drop folder by the rest of the process

      On this I step originally wasn’t paying attention to the dialog and put the entire command line  in the “tool” text box. That won’t work and you’ll get an error claiming the tool executable can’t be found. That took a while to chase down in my case because a lot of the older posts/forums discuss how to get the dotnet tooling installed into a VSTS Build agent – but it is now built in (Its at C:\program files\dotnet”)

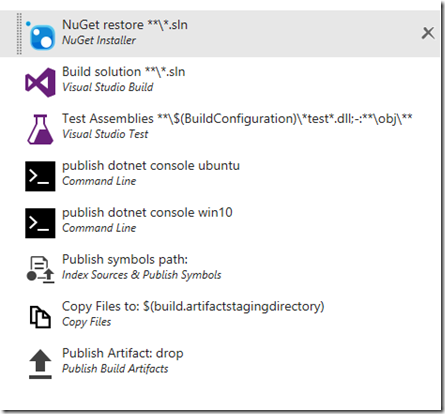
      The final build process looks like this
      capture20160814130253915

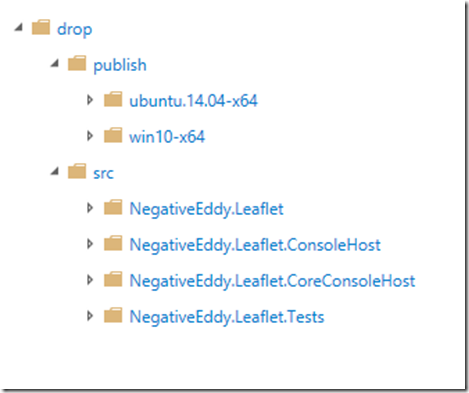
  4. After a build is performed the drop folder looks like this
    capture20160814130415970
    I left in the original “Copy Files to” step in the build so that I had access to everything that was built as things progressed. But to run things I just need the folders under the “publish” directory
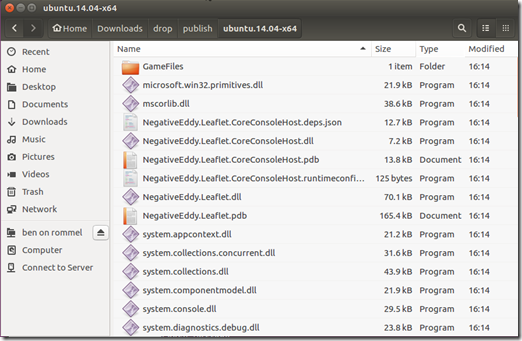
  5. Log in to Ubuntu and download the publish directory
    capture20160814130646617
  6. Last step is to run it
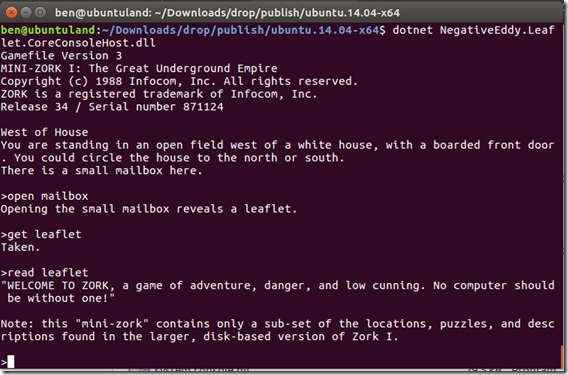
    capture20160814111814829


So the current overall workflow now is

  1. Update the project on Windows in Visual Studio Community 2015
  2. Check in to Github
  3. VSTS automatically builds, runs unit test, and packages
  4. Download to Windows or Ubuntu to run

Next I’m thinking “What could be better than running a 35 year old text adventure on Azure Service Fabric?”

Posted in Dev Stuff, ZMachine, Zork | Leave a comment

Using C# to build 35 year old tech is fun

I’ve always been a fan of Zork. If you’ve been playing games awhile (and I mean a whiiiile) then you probably are too. For those of you who aren’t familiar with it, its the original text adventure game. No graphics. Just type actions, and get text feedback. It created the whole genre of Interactive Fiction. You can actually still play it online

Recently I was on vacation and looking for a project and happened to spot Eric Lippert’s blog series describing his implementation of the Zork engine (called a ZMachine) in order to learn OCaml. I realized he was deciphering the mess that is the ZMachine spec that had always seemed a bit opaque to me. Its a seriously interesting bit of engineering to make an actual cross platform virtual machine that ran on the old Apple II TRS-80, Commodores, etc in the 80s. But a lot of their optimizations make for dense and confusing bit twiddling.

I got inspired and started building my own version in C# in an object oriented fashion with current C# techniques and libraries and unit tests.

Mine is called Leaflet and I just put it up on GitHub and will be updating it slowly. I have some oddball plans to see what I can do with this and still make sense. As an example, a while back I did an experiment with someone else’s implementation by adding Cortana’s voice recognition and Text to Speech to make it work on my Windows Phone.

Its C#
Its a .NET PCL (will run on Azure, Windows, and Linux!)
Its not optimized… yet
Its object oriented.
Its very much in progress…

I plan to write a series of posts here on some of the things I’ve learned along the way.

maybe someday I’ll revisit and reimplement it in F#.

Posted in Dev Stuff, Programming, Tinkering, ZMachine, Zork | Leave a comment

Do you have a Twinkie?

I want to be this guy. This guy who was behind us in line at the grocery store.

I’m standing there while the cashier rings up my cart, and I notice the guy behind me standing innocently doing nothing.
Then he picks up a Twinkie from his cart.
He starts to smile.
He starts to open the Twinkie.
He starts to grin.
He starts to eat the Twinkie.
He is in ecstasy.
He continues eating his Twinkie.
He is completely oblivious to the outside world.
He has no worries.
He has no problems.
He just has a Twinkie.
Enjoying his Twinkie.
Enjoying his life.

Posted in life | Leave a comment

Waaaaay oversimplified async/await plumbing

[cross posted from my MSDN blog]

Often, when someone asks “how does this async await stuff actually work”? There is a lot of hand waving or someone says “just use reflection and look at it” but the real compiled code is a complex recursive state machine. So I want to show a (relatively) simplified example that isn’t the real thing but is conceptually correct.

Conceptually, the way I think about it is that the compiler just breaks down my method into a series of tasks that need to be run. Lets start with a simple scenario which has a single await.

image

We kind of hide the Task by default but if you change it to look like this, you can see we aren’t awaiting the method, we are awaiting the Task returned from the method.

image

Now we can take the async/await keywords away by breaking the method up into 2 areas – the code that runs before the await, and the code that runs after the await. Because the GetCountAsync() call is async, we can’t run that “after” code immediately. We want to wait until after countTask is complete and then run the “after” code. So what actually runs looks more like this

image

As you can see, we have taken the “after” code and told it to run as a continuation of the countTask. This means that the GetCountAsync method will run and whenever it gets done, the “after” code will execute. Of course this means we have another task to deal with. The “after” code continuation provides us a new Task object to know when that is done. When that is finished we know that our entire method is finished. So we can return that final Task to the caller of our method so that they will know when we are complete.

Now this is definitely not a complete picture (e.g. we are not dealing with looping or exceptions or managing the UI thread). But I find this a pretty compelling way to demonstrate a couple of key principles.

  1. When you use the async keyword, your method becomes asynchronous because it gets broken into Tasks based on the await keywords in use.
  2. Your async method will return before it completes. Yes, that’s the whole point and is obvious to some people, but here it is shown explicitly because in the final example above, our method isn’t doing any real work except creating the Task chain and then returning.
  3. The code before the first await always runs synchronously. There is no Task management going on until you hit the first await. So if you have a 10 second operation before the first await, the method will take 10 seconds and then hook up the task chain and return.
  4. This is why your callstack looks different when debugging. The “after” code is not being called from DoWorkWithoutAwait(). It is being called directly from the .NET Task infrastructure as a continuation of the previous task.

Taking that a bit further

Lets take that concept and apply it to a more realistic method which contains  multiple awaits.

image

In the same steps, we can think of this as dividing our method up into a number of intermediate Tasks separated by the await keywords.

image

Again, this just demonstrates those same points that I see some developers forget or struggle with. When I see a series of await keywords, I’m thinking about how that method gets broken down into individual tasks – not how it is going to run as a single unit. This helps me remember that even if this ends up running on a single thread, the fact that is gets chunked up means that other scheduled code can potentially run in between my method’s various sections. You can also see this concept graphically in this previous post.


Additional files

Posted in Windows Phone | Tagged , , , | Leave a comment